
All in all, there are 28 individual steps taken in the making of our neon pouches, from scoring, gluing and stitching, incorporating the lining, attaching zips, stitching the logo, adding our signature beaded tab, and steam pressing. Before this process can begin, the plain canvas is screen printed. Below is a photographic look at the main steps in the maker process.
MAKING THE SCREEN
We choose to screenprint, rather than digitally print, our designs because it produces vivid, unparalleled color, and the way the print lies on the surface of the canvas adds a tactile quality that we love. So, what exactly is screen printing? It's a multi-stage process that requires great skill and experience, but elementally, a stencil design is transferred onto a flat surface using a mesh screen, ink, and a squeegee.


We work with Dragonfly Designs master screen printer Joseph Mwaka, who has over 30 years of experience in the industry to create the screens to print the Kuba and Zebra-print. This is the first time we have applied our Zebra-print to our pouches.
To kick off the process, the Kuba and Zebra design is printed onto a transparent acetate film. Later on, Mwaka will use this to create the stencil design. At this point, he measures and lines up the pattern before he begins the entire process.With his studio assistant Daniel Matee, Mwaka prepares a wooden frame that is large enough for the pattern. Then, he uses a staple gun to affix a thin mesh material to the edge, ensuring that it is as taut as possible.


The mesh is then wiped down with water and a sponge to remove any dust or particles and dried. The screen must be as clean as possible before Mwaka moves to the next step. Any dirt or particles could compromise the quality of the stencil. Mwaka then takes the screen to the darkroom, where he applies a light-reactive emulsion to the screen. Once applied, a heater fan helps dry the emulsion. When dry, Mwaka lays the acetate sheet featuring the Zebra print design onto the emulsion-coated screen and takes the screen outside to be exposed to the sunlight. Once exposed, Daniel assists Mwaka by lifting the acetate sheet with the design. Next, Mwaka washes off the remaining emulsion with water and a sponge, and jet sprays of water.


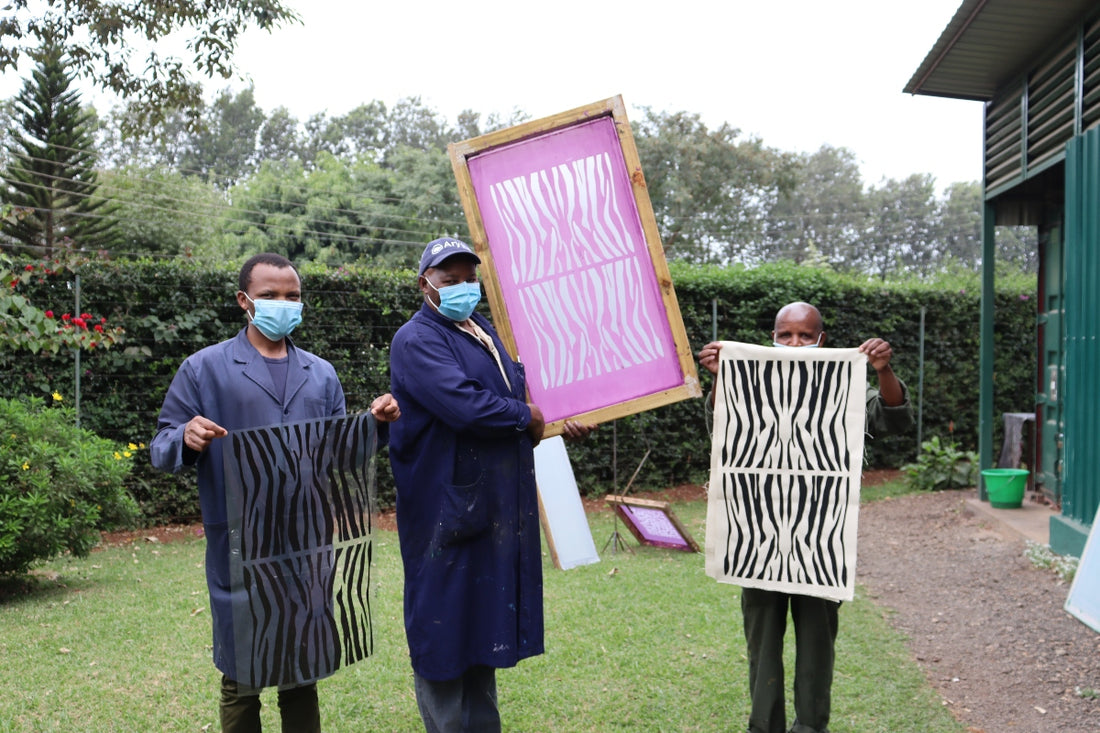
When this process is complete, you can clearly see the imprint of the design on the screen where the ink will pass through. Mwaka places the screen to dry in the sun. And once completely dry, he does a final check and makes any necessary touch-ups or corrections to make the imprint as accurate as possible to the original design. The screen is now ready to be used!

SCREEN PRINTING

With the screens complete, we work with Mwaka to create just the right shades of neons. Studio assistant Daniel Matee lays out the panels of canvas, which have been pre-cut in our studio on Maai Mahiu, on the printing bench. Mwaka carefully lines up the screen and lowers it down onto the printing board.


Next, he adds the neon ink to the top end of the screen and uses a squeegee to pull the ink along the entire screen length. The squeegee presses the ink through the open areas of the stencil, and voila, the Kuba and Zebra designs have been screen printed on the canvas!


The printed canvas panels are first sun-dried and then passed through a curing machine that completely locks in color to not run or smudge when washed. All the neon panels are transported from the Dragonfly Design's Studio in the Karen suburb of Nairobi to our Maker Studio in Maai Mahiu.

THE MAKER PROCESS
STEP 1:
Cutting the screen-printed canvas panel to the pattern of the pouch


STEP 2:
Cutting and assembling the zip


STEP 3:
Folding the flat pattern over and stitching together to form the pouch


STEP 4:
Sewing the zip and leather pullers


STEP 5:
Stitching the Ubuntu Logo


STEP 6:
Final quality control and steam pressing the pouch


